วันศุกร์ที่ 1 มีนาคม พ.ศ. 2556

พื้นฐาน Android Version 4.1 Up.

สวัสดีชาว Java Thai Talk ทุกท่านนะครับ

ก่อนอื่นต้องขออภัย ที่ไม่ค่อยได้เข้ามา update ข้อมูลใน บล๊อกแต่ก็ต้องตกใจ ฮ้าๆๆ ผมเข้าดูสถิติ ผลคืนมีคนเข้ามาในบล๊อก นี้เยอะขึ้น เลยมีแรงอยากจะกลับมา update ข้อมุลอีกครั้ง แต่ว่า เรื่องที่จะเขียน ในปีนี้น่าจะเป็น เรื่อง การเขียน Application Android เป็นส่วนใหญ่นะครับ


Application Component ใน  Android Application.
    Application Component คือ Component หลักที่ใช้ในการสร้าง Android Application โดย Application Component แบ่งออกเป็น 4 ประเภท ได้แก่ Activity, Service, Content Provider, และ Broadcast Receiver ซึ่งแต่ละประเภทของ Application Component นี้มีเป้าหมายในการใช้งานที่แตกต่างกัน มีรูปแบบการกระตุ้นให้เกิดการทำงานที่แตกต่างกัน (กล่าวคือบาง Application Component ถูกกระตุ้นให้เกิดการทำงานโดย System และบาง Application Component ถูกกระตุ้นให้เกิดการทำงานโดย Application Component อื่น ๆ ) รวมถึงมีวงจรชีวิตที่แตกต่างกันด้วย (กล่าวคือแต่ละ Application Component จะมีรูปแบบที่แตกต่างกันว่า Application Component นั้น ๆ จะถูกสร้าง (Create) เมื่อใด หรือถูกทำลาย (Destroy) เมื่อใด )


Application Component สามารถแบ่งออกได้เป็น 4 ประเภทดังนี้.

1. Activity
         คือ Application Component ที่ใช้ในการควบคุมการสร้าง User Interface เช่น การแสดงผลหน้าจอรายการอีเมล์, การแสดงหน้าจอแบบฟอร์มการส่งอีเมล์ เป็นต้น รวมถึงควบคุมการมีปฏิสัมพันธ์ระหว่างผู้ใช้กับ User Interface ด้วย เช่น เมื่อผู้ใช้เลือกรายการอีเมล์ก็จะทำการตอบสนองผู้ใช้โดยการแสดงข้อมูลรายการ อีเมล์ที่เลือก เป็นต้น สำหรับการสร้าง Activity นั้น ทำได้โดยการสร้าง Class และให้สืบทอดจาก Class Activity หรือสืบทอดจาก Class ใด ๆ ก็ตามที่ได้รับการสืบทอดมาจาก Class Activity โดย Activity หนึ่ง ๆ จะควบคุมการแสดงผล User Interface หนึ่ง ๆ เท่านั้น และนั่นแสดงให้เห็นว่า Application หนึ่ง ๆ จะประกอบด้วย Activity จำนวนมากที่ทำงานร่วมกันอยู่ อย่างไรก็ตามถึงแม้ว่า Activity จะทำงานร่วมกัน แต่ Activity เหล่านั้นยังคงเป็นอิสระจากกัน

2. Service
         คือ Application Component ที่ไม่มี User Interface และจะทำการประมวลผลใน Background กล่าวคือเป็นการประมวลผลที่ดำเนินไปพร้อมกับที่ผู้ใช้สามารถไปใช้งาน Application อื่น ๆ ได้ หรือกล่าวอีกมุมหนึ่ง การประมวลผลใน Background คือการประมวลผลที่สามารถทำงานขนานกันกับการทำงานอื่น ๆ ของผู้ใช้ ทั้งนี้ก็เพื่อทำให้เกิดการทำงานใด ๆ โดยที่ผู้ใช้ไม่จำเป็นต้องอยู่ในหน้าจอนั้น ๆ ได้ ซึ่งอาจเป็นเพราะการทำงานนั้นต้องใช้ระยะเวลานาน เช่น การใช้ Service เปิดเพลง เพื่อให้ผู้ใช้สามารถไปใช้ Application อื่น ๆ ได้ แต่เพลงยังคงเล่นอยู่ หรือ การใช้ Service ดาวน์โหลดข้อมูลใด ๆ ที่มีขนาดใหญ่ เพื่อให้ผู้ใช้สามารถไปใช้ Application อื่น ๆ ได้ แต่การดาวน์โหลดยังคงดำเนินอยู่ เป็นต้น สำหรับการสร้าง Service นั้นทำได้โดยการสร้าง Class และให้สืบทอดจาก Class Service หรือสืบทอดจาก Class ใด ๆ ก็ตามที่ได้รับการสืบทอดมาจาก Class Service

3. Content Provider
         คือ Application Component ที่ทำหน้าที่ในการควบคุมข้อมูลใด ๆ ของ Application ที่ต้องการ Share ให้ Application อื่น ๆ สามารถนำข้อมูลนั้น ๆ ไปใช้งานได้ หรือกล่าวในทางกลับกันก็คือ Application ใด ๆ สามารถนำข้อมูล (รวมถึงแก้ไขข้อมูลได้ ถ้า Content Provider อนุญาติ) ของ Application อื่น ๆ มาใช้งานได้ โดยกระทำผ่าน Content Provider เช่น System ได้จัดเตรียม Content Provider ที่เป็นข้อมูลรายชื่อผู้ติดต่อ (Contact) ไว้ เพื่อให้ Application ที่ต้องการใช้ข้อมูลรายชื่อผู้ติดต่อนี้ สามารถนำข้อมูลไปใช้หรือแก้ไขข้อมูลได้ เป็นต้น สำหรับการสร้าง Content Provider นั้น ทำได้โดยการสร้าง Class และให้สืบทอดจาก Class ContentProvider หรือสืบทอดจาก Class ใด ๆ ก็ตามที่ได้รับการสืบทอดมาจาก Class ContentProvider

4. Broadcast Receiver
         คือ Application Component ที่ไม่มี User Interface โดยจะทำหน้าที่รับรู้สิ่งที่เกิดขึ้นของ System และนำมาบอกให้ผู้ใช้ได้รับรู้ เช่น เมื่อ Battery ต่ำ, เมื่อหน้าจอถูก Capture, เมื่อมีการพักหน้าจอ เป็นต้น ทั้งนี้ Application ใด ๆ สามารถนำ Broadcast Receiver มาใช้ประโยชน์ได้ เช่น เมื่อ Application ได้ Download ข้อมูลเสร็จเรียบร้อย เป็นต้น ซึ่งโดยส่วนมากแล้วการตอบสนองของ Broadcast Receiver จะกระทำผ่าน Notification เพื่อแจ้งสิ่งที่เกิดขึ้นให้ผู้ใช้ได้รับรู้ สำหรับการสร้าง Broadcast Receiver นั้น ทำได้โดยการสร้าง Class และให้สืบทอดจาก Class BroadcastReceiver หรือสืบทอดจาก Class ใด ๆ ก็ตามที่ได้รับการสืบทอดมาจาก Class BroadcastReceiver


Credit : http://www.softmelt.com/article.php?id=106

วันพุธที่ 5 กันยายน พ.ศ. 2555

อยากลองฝึก Jdeveloper ช่วยแนะนำแหล่งข้อมูลหน่อยตั้งแต่เบือ้งต้นเลยครับ และขอถามปัญหานิดนึงครับ - BC4J และ OJSP ใน Jdeveloper คืออะไรครับ ใช้ทำอะไร - ถ้าจะนำ BC4J , OJSP ไปใช้กับ Web Server อื่นๆ นอกจากของ Oracle เช่น Tomcat จะได้ไหมครับ?

อยากลองฝึก Jdeveloper ช่วยแนะนำแหล่งข้อมูลหน่อยตั้งแต่เบือ้งต้นเลยครับ และขอถามปัญหานิดนึงครับ
- BC4J และ OJSP ใน Jdeveloper คืออะไรครับ ใช้ทำอะไร
- ถ้าจะนำ BC4J , OJSP ไปใช้กับ Web Server อื่นๆ นอกจากของ Oracle เช่น Tomcat จะได้ไหมครับ 

------------------------------------------------------------------------------------------------------------------


Quote
อยากลองฝึก Jdeveloper ช่วยแนะนำแหล่งข้อมูลหน่อยตั้งแต่เบือ้งต้นเลยครับ
1.แหล่งข้อมูลเบื้องต้น
http://otn.oracle.co...ev/content.html "

Quote
BC4J และ OJSP ใน Jdeveloper คืออะไรครับ ใช้ทำอะไร
2. ojsp เป็น jsp containers ครับ ที่ทาง Oracle Implement ขึ้นซึ่งก็จะมี tag ที่ใช้งานกับ Database เพิ่มเติมจาก stardard ครับอ
3. ฺBC4J เป็น Framework ที่ช่วยให้ การพัฒนา Enterprise Application ที่ต้องติดต่อกับ RDBMS ทำได้สะดวกขึ้นครับ สำหรับรายละเอียดของ BC4J ลองอ่าน paper นี้ดูนะครับ " http://otn.oracle.co.../j2ee_bc4j.html "

Quote
ถ้าจะนำ BC4J , OJSP ไปใช้กับ Web Server อื่นๆ นอกจากของ Oracle เช่น Tomcat จะได้ไหมครับ
4. Applicaiton ที่พัฒนาด้วย BC4J สามารถเลือกที่จะ Deploy ไป J2EE Server ที่เราต้องการได้ ซึ่งไม่จำเป็นต้องเป็น ของ Oracle ดูวิธีการ deploy ไปยัง Server ที่ไม่ใช่ Oracle ที่นี้ครับ " http://otn.oracle.co...os/content.html "

5. ส่วน ojsp เราก็เพียงแต่ set ให้ J2EE engine ที่เราต้องการนั้นรู้จ้ก Library ของ ojsp ก็สามารถทำงานได้ครับ 


แหล่งข้อมูล   http://www.narisa.com  : http://www.narisa.com/forums/index.php?showtopic=360

วันพุธที่ 29 สิงหาคม พ.ศ. 2555

วันพุธที่ 15 กุมภาพันธ์ พ.ศ. 2555

RESTful Webservices with Java (Jersey / JAX-RS) ตอนที่ 1

สวัสดีครับ ทุึกคน วันนี้ก็ถึงเวลาที่เราจะมาทดลองการเขียน Webservice กันสักที


Table 1. Sample Table
AnnotationDescription
@PATH(your_path)Sets the path to base URL + /your_path. The base URL is based on your application name, the servlet and the URL pattern from the web.xml" configuration file.
@POSTIndicates that the following method will answer to a HTTP POST request
@GETIndicates that the following method will answer to a HTTP GET request
@PUTIndicates that the following method will answer to a HTTP PUT request
@DELETEIndicates that the following method will answer to a HTTP DELETE request
@Produces( MediaType.TEXT_PLAIN [, more-types ] )@Produces defines which MIME type is delivered by a method annotated with @GET. In the example text ("text/plain" ) is produced. Other examples would be "application/xml" or "application/json".
@Consumes( type [, more-types ] )@Consumes defines which MIME type is consumed by this method.
@PathParamUsed to inject values from the URL into a method parameter. This way you inject for example the ID of a resource into the method to get the correct object.
The complete path to a resource is therefore based on the base URL and the @PATh annotation in your class.
http://your_domain:port/display-name/url-pattern/path_from_rest_class


Tools ที่เราใช้ประกอบไปด้วย
1. Eclipse Helios
2. Tomcat 6.0


1.Create Java Web Dynamic


library ทั้งหมดที่เกี่ยวข้อง


cccc


1.Domain


package com.blogspot.javathaitalk.domain;


public class Track {


String title;
String singer;


public String getTitle() {
return title;
}


public void setTitle(String title) {
this.title = title;
}


public String getSinger() {
return singer;
}


public void setSinger(String singer) {
this.singer = singer;
}


@Override
public String toString() {
return "Track [title=" + title + ", singer=" + singer + "]";
}


}

2.Java Class Service


package com.blogspot.javathaitalk.webservices.rest;


import javax.ws.rs.Consumes;
import javax.ws.rs.GET;
import javax.ws.rs.POST;
import javax.ws.rs.Path;
import javax.ws.rs.Produces;
import javax.ws.rs.core.MediaType;
import javax.ws.rs.core.Response;


import com.blogspot.javathaitalk.domain.Track;


@Path("/json/metallica")
public class JSONService {


@GET
@Path("/get")
@Produces(MediaType.APPLICATION_JSON)
public Track getTrackInJSON() {


Track track = new Track();
track.setTitle("Enter Sandman");
track.setSinger("Metallica");


return track;


}


@POST
@Path("/post")
@Consumes(MediaType.APPLICATION_JSON)
public Response createTrackInJSON(Track track) {


String result = "Track saved : " + track;
return Response.status(201).entity(result).build();

}

}


3.Jersey Client Get


package com.blogspot.javathaitalk.webservices.client;


import com.sun.jersey.api.client.Client;
import com.sun.jersey.api.client.ClientResponse;
import com.sun.jersey.api.client.WebResource;


public class JerseyClientGet {


public static void main(String[] args) {
try {


Client client = Client.create();


WebResource webResource = client.resource("http://localhost:8080/DemoRESTfulExample/rest/json/metallica/get");


ClientResponse response = webResource.accept("application/json")
.get(ClientResponse.class);


if (response.getStatus() != 200) {
throw new RuntimeException("Failed : HTTP error code : "
+ response.getStatus());
}


String output = response.getEntity(String.class);


System.out.println("Output from Server .... \n");
System.out.println(output);


} catch (Exception e) {


e.printStackTrace();


}


}


}

4.Jersey Client Post


package com.blogspot.javathaitalk.webservices.client;


import com.sun.jersey.api.client.Client;
import com.sun.jersey.api.client.ClientResponse;
import com.sun.jersey.api.client.WebResource;


public class JerseyClientPost {


public static void main(String[] args) {


try {


Client client = Client.create();


WebResource webResource = client
.resource("http://localhost:8080/DemoRESTfulExample/rest/json/metallica/post");


String input = "{\"singer\":\"Metallica\",\"title\":\"Fade To Black\"}";


ClientResponse response = webResource.type("application/json")
.post(ClientResponse.class, input);


if (response.getStatus() != 201) {
throw new RuntimeException("Failed : HTTP error code : "
+ response.getStatus());
}


System.out.println("Output from Server .... \n");
String output = response.getEntity(String.class);
System.out.println(output);


} catch (Exception e) {


e.printStackTrace();


}


}


}

 5.Define Jersey Servlet dispatcher


<?xml version="1.0" encoding="UTF-8"?>
<web-app xmlns:xsi="http://www.w3.org/2001/XMLSchema-instance" xmlns="http://java.sun.com/xml/ns/javaee" xmlns:web="http://java.sun.com/xml/ns/javaee/web-app_2_5.xsd" xsi:schemaLocation="http://java.sun.com/xml/ns/javaee http://java.sun.com/xml/ns/javaee/web-app_2_5.xsd" id="WebApp_ID" version="2.5">
  <display-name>DemoRESTfulExample</display-name>
  
  <welcome-file-list>
    <welcome-file>index.jsp</welcome-file>
  </welcome-file-list>
  
  <servlet>
<servlet-name>jersey-serlvet</servlet-name>
<servlet-class>com.sun.jersey.spi.container.servlet.ServletContainer</servlet-class>
<init-param>
<param-name>com.sun.jersey.config.property.packages</param-name>
<param-value>com.blogspot.javathaitalk.webservices.rest</param-value>
</init-param>
<init-param>
<param-name>com.sun.jersey.api.json.POJOMappingFeature</param-name>
<param-value>true</param-value>
</init-param>
<load-on-startup>1</load-on-startup>
</servlet>


<servlet-mapping>
<servlet-name>jersey-serlvet</servlet-name>
<url-pattern>/rest/*</url-pattern>
</servlet-mapping>

</web-app>


สำหรับการทดสอบ Webservice ให้ทำการ Run Java Web ก่อน แล้วค่อยไปเรียกทดสอบ Client แบบ java App ธรรมดาทีหลัง

1.ทดสอบ เรียกผ่าน URL ด้วย Get Method


2.ทดสอบเรียกผ่าน JerseyClientGet Class


3.ทดสอบเรียกผ่าน JerseyClientPost Class


*ปล. ถ้าใครอยากได้ SourceCode ให้ Comment ไว้นะครับ เดี๋ยวผมจะส่งให้ทาง Email.

วันอังคารที่ 14 กุมภาพันธ์ พ.ศ. 2555

Struts 2 > Hello World Application

    ในแบบฝึกหัดนี้เราจะแสดงให้เห็นถึงวิธีการสร้าง Strust 2 แบบง่ายๆ ด้วย Hello World Application ก่อนการสร้างจะมีไฟล์ที่ประกอบการทำ Application ตามข้อมูลด้านล่างเลยครับ.

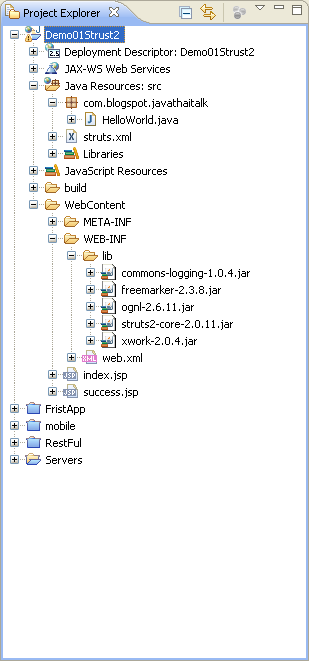
ไฟล์หลักๆ ในการทดสอบ  Hello World Application

  • web.xml
  • struts.xml
  • HelloWorld.java
  • index.jsp
  • success.jsp


รูปด้านล่างแสดงโครงสร้างของ Hello World Application


web.xml


<filter>
02.<filter-name>struts2</filter-name>
03.<filter-class>org.apache.struts2.dispatcher.FilterDispatcher </filter-class>
04.</filter>
05.<filter-mapping>
06.<filter-name>struts2</filter-name>
07.<url-pattern>/*</url-pattern>
08.</filter-mapping>
09.<welcome-file-list>
10.<welcome-file>index.jsp</welcome-file>
11.</welcome-file-list>

struts.xml

1.<struts>
2.<package name="default" extends="struts-default">
3.<action name="HelloWorld" class="com.blogspot.javathaitalk.HelloWorld">
4.<result name="SUCCESS">/success.jsp</result>
5.</action>
6.</package>
7.</struts>

index.jsp

01.<%@taglib uri="/struts-tags" prefix="s" %>
02. 
03.<html>
04.<head>
05.<title>Hello World</title>
06.</head>
07.<body>
08.<s:form action="HelloWorld" >
09.<s:textfield name="userName" label="User Name" />
10.<s:submit />
11.</s:form>
12.</body>
13.</html>

HelloWorld.java


01.public class HelloWorld {
02. 
03.private String message;
04. 
05.private String userName;
06. 
07.public HelloWorld() {
08.}
09. 
10.public String execute() {
11.setMessage("Hello " + getUserName());
12.return "SUCCESS";
13.}
14. 
15.public String getMessage() {
16.return message;
17.}
18. 
19.public void setMessage(String message) {
20.this.message = message;
21.}
22. 
23.public String getUserName() {
24.return userName;
25.}
26. 
27.public void setUserName(String userName) {
28.this.userName = userName;
29.}
30. 
31.}
ขันตอนของการ execute() method ของ class HelloWorld เราสามารถเข้าถึงข้อมูลของ properties ได้จาก Class นี้ซึ่งต่างจาก Struts 1 ที่ต้องมี Form. เราสามารถทำ Java class action ได้ง่ายๆ.

success.jsp

สำหรับ หน้า success เราจะทำการแสดงข้อความ "Hello คนไทย" โดยที่มันจะแสดงผ่าน property tag ที่ชื่อว่า message ด้านล่าง.
01.<%@taglib uri="/struts-tags" prefix="s" %>
02.<html>
03.<head>
04.<title>Hello World</title>
05.</head>
06.<body>
07.<h1><s:property value="message" /></h1>
08.</body>
09.</html>

Demo After Run Application


* ถ้าใครต้องการ demo application ให้ comment และฝาก email ไว้นะครับ ผมจะส่งให้ทาง email.